Create your first plugin

Purpose of Plugin Creation
Creating plugins directly from the user interface (UI) allows you to extend the functionality of your application without the need for complex integrations with other services. Plugins can enhance user experience, add new features, and provide customizable options tailored to specific needs. They offer flexibility in development and deployment, enabling both frontend and backend management. This approach empowers developers and administrators to efficiently implement and control enhancements, ensuring the application evolves to meet user requirements.
Step-by-Step Instructions
Login to the Platform
- Go to the platform's login page.
- Enter your admin credentials to log in.
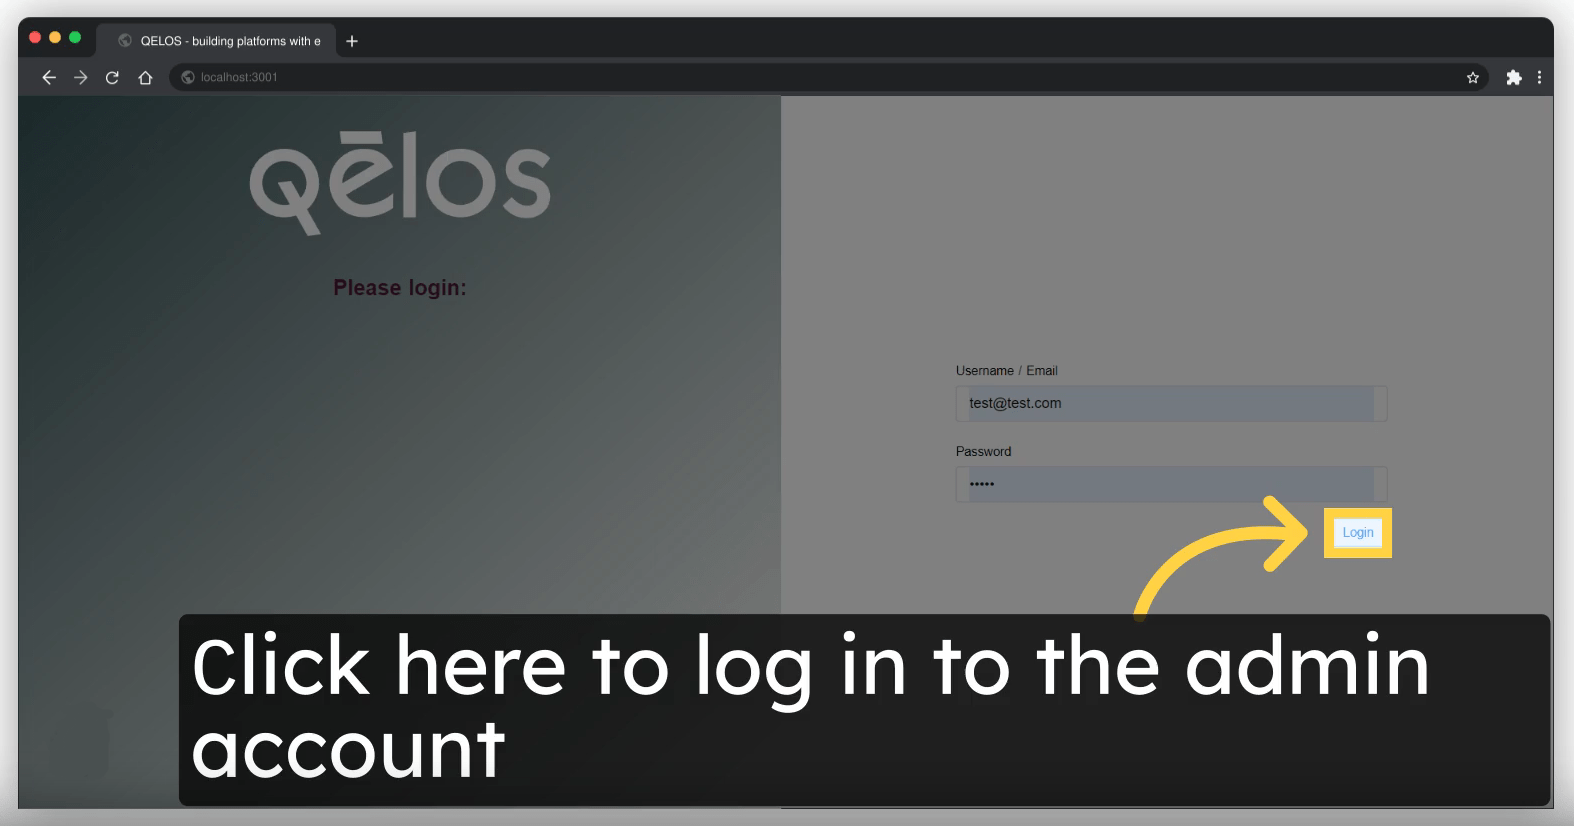
Create a Plugin from "Plugins List" Section
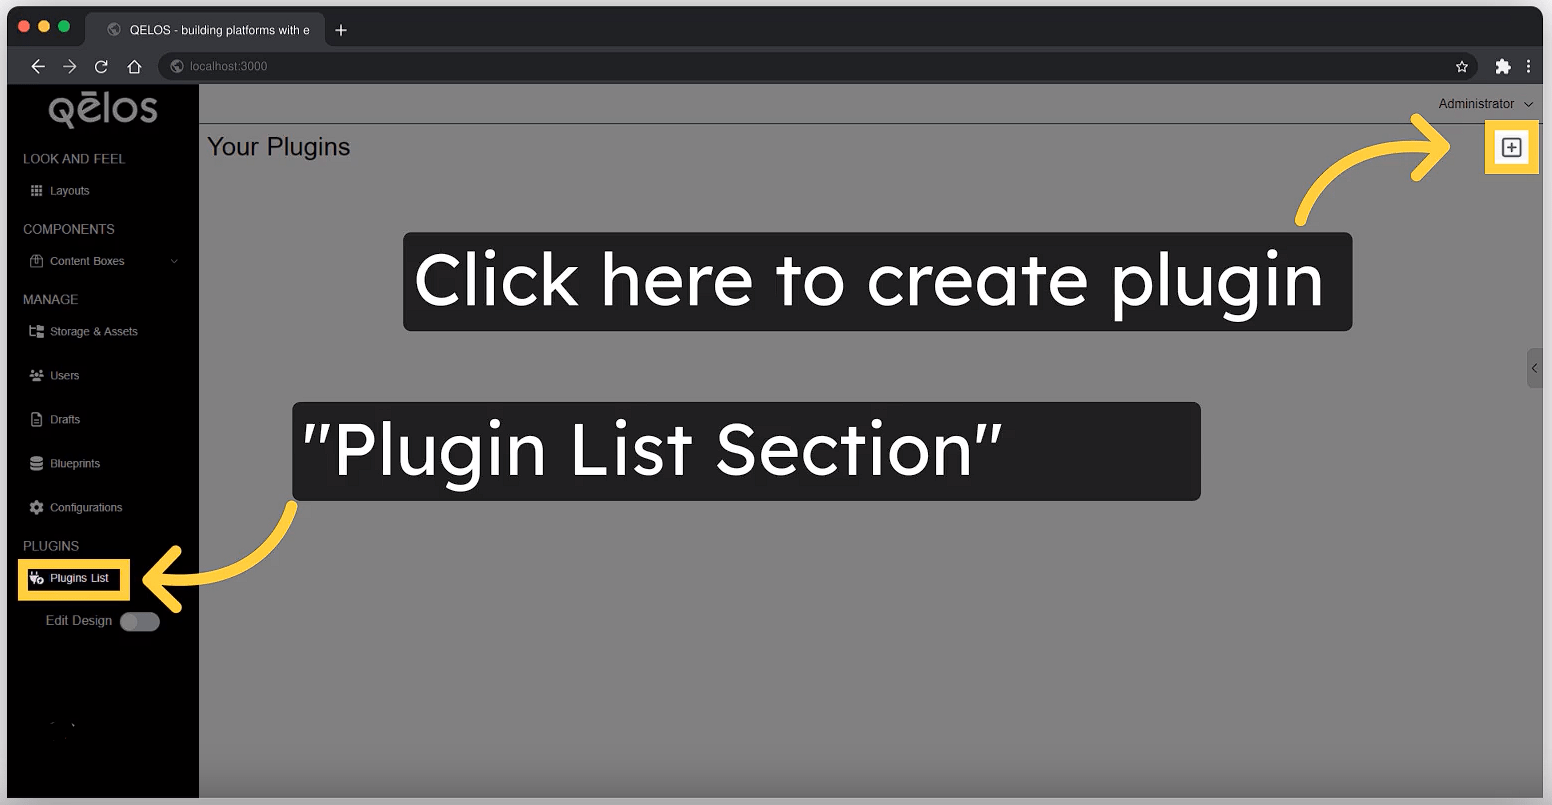
- Go to the "Plugins List" section and click on the "add" button in the UI to create a new plugin.
Manifest URL and Plugin API Path Configuration
Ensure you set up the Manifest URL and Plugin API Path correctly to facilitate communication between the plugin and the server.
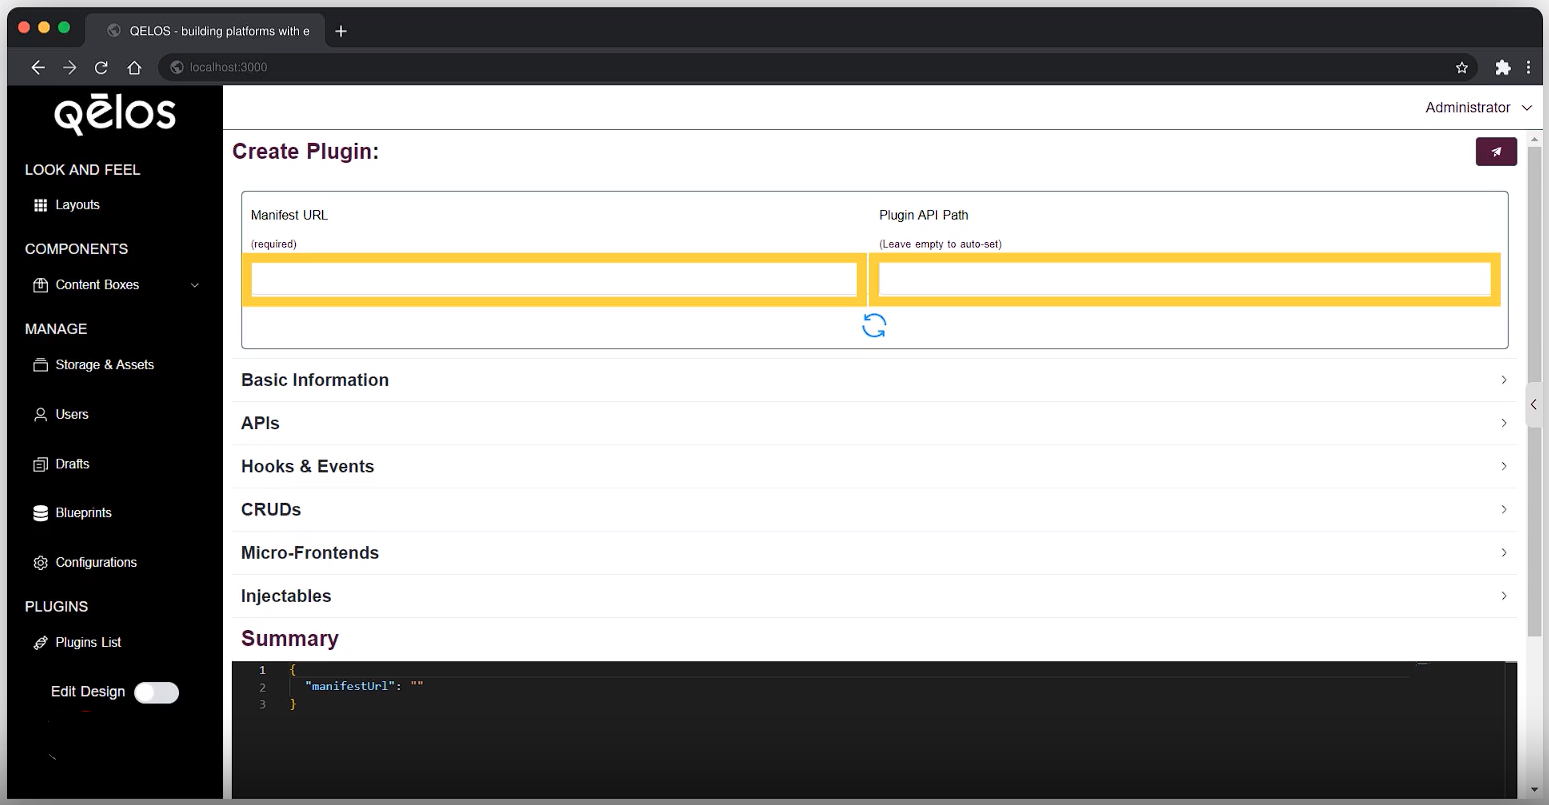
Basic Information Configuration
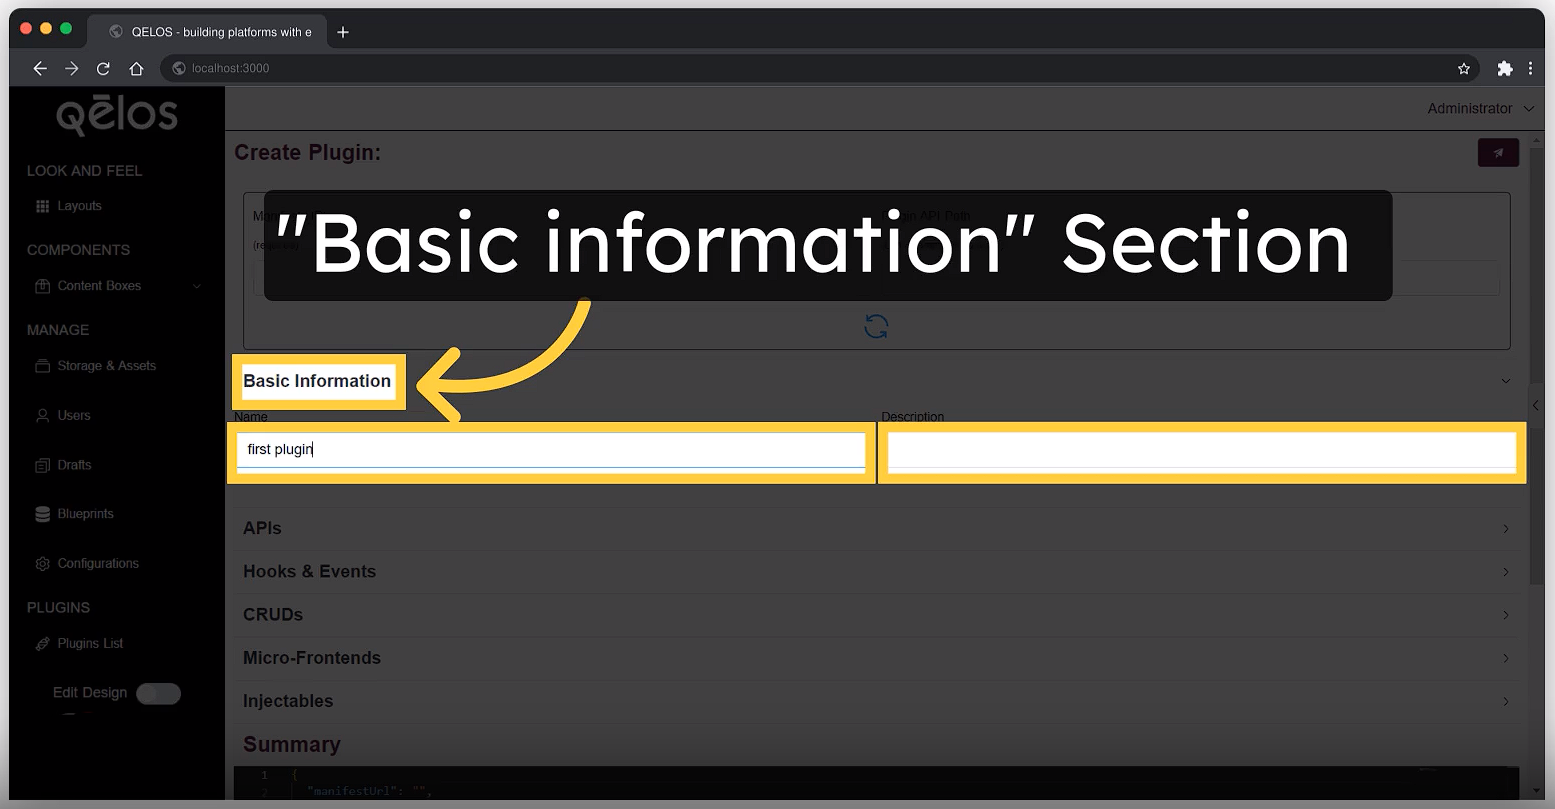
- Here you need to create name of your plugin (required) and you can add description for it
APIs Section
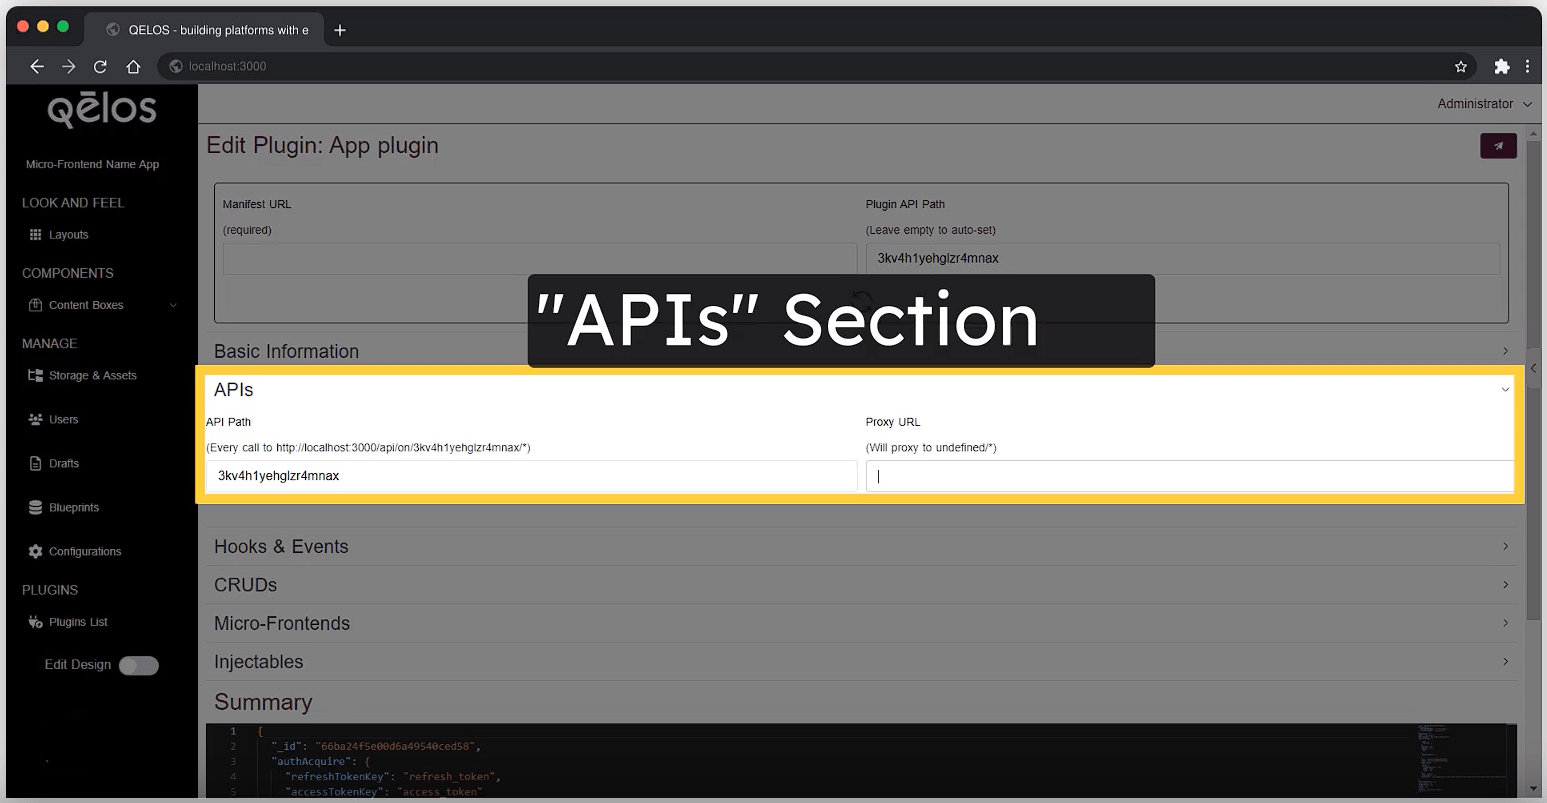
In this section, we explain how to configure and use the API path that defines a proxy to the plugin API. This setup ensures that every call made to a specific path will be forwarded to the corresponding server of the plugin.
API Path Configuration
The API path is used to route calls made to your local server to the plugin's server via a proxy. This allows your local application to communicate with the plugin seamlessly, as if it were interacting with a local resource.
API Path
Every call made to the following URL: http://localhost:3000/api/on/3kv4h1yehglzr4mnax/* will be proxied to the plugin server. This means that any request targeting this path will be forwarded to the plugin's server, allowing the plugin to handle the request as intended.
Proxy URL
The actual proxy URL is defined but currently shows as undefined/*. Typically, this should be the base URL where the plugin's server is running. The proxy URL might be dynamically configured or retrieved from the plugin's configuration settings.
When the proxy is correctly set up, any request to the API Path (http://localhost:3000/api/on/3kv4h1yehglzr4mnax/*) will be forwarded to the appropriate route on the plugin's server, allowing for smooth integration between your application and the plugin.
Example
If the plugin server is running at http://pluginserver.com, the proxy URL should be: http://pluginserver.com/*
This would mean that a request to http://localhost:3000/api/on/3kv4h1yehglzr4mnax/some-endpoint would be forwarded to http://pluginserver.com/some-endpoint.
Ensure the proxy URL is correctly defined to avoid issues in routing requests to the plugin server.
Hooks & Events
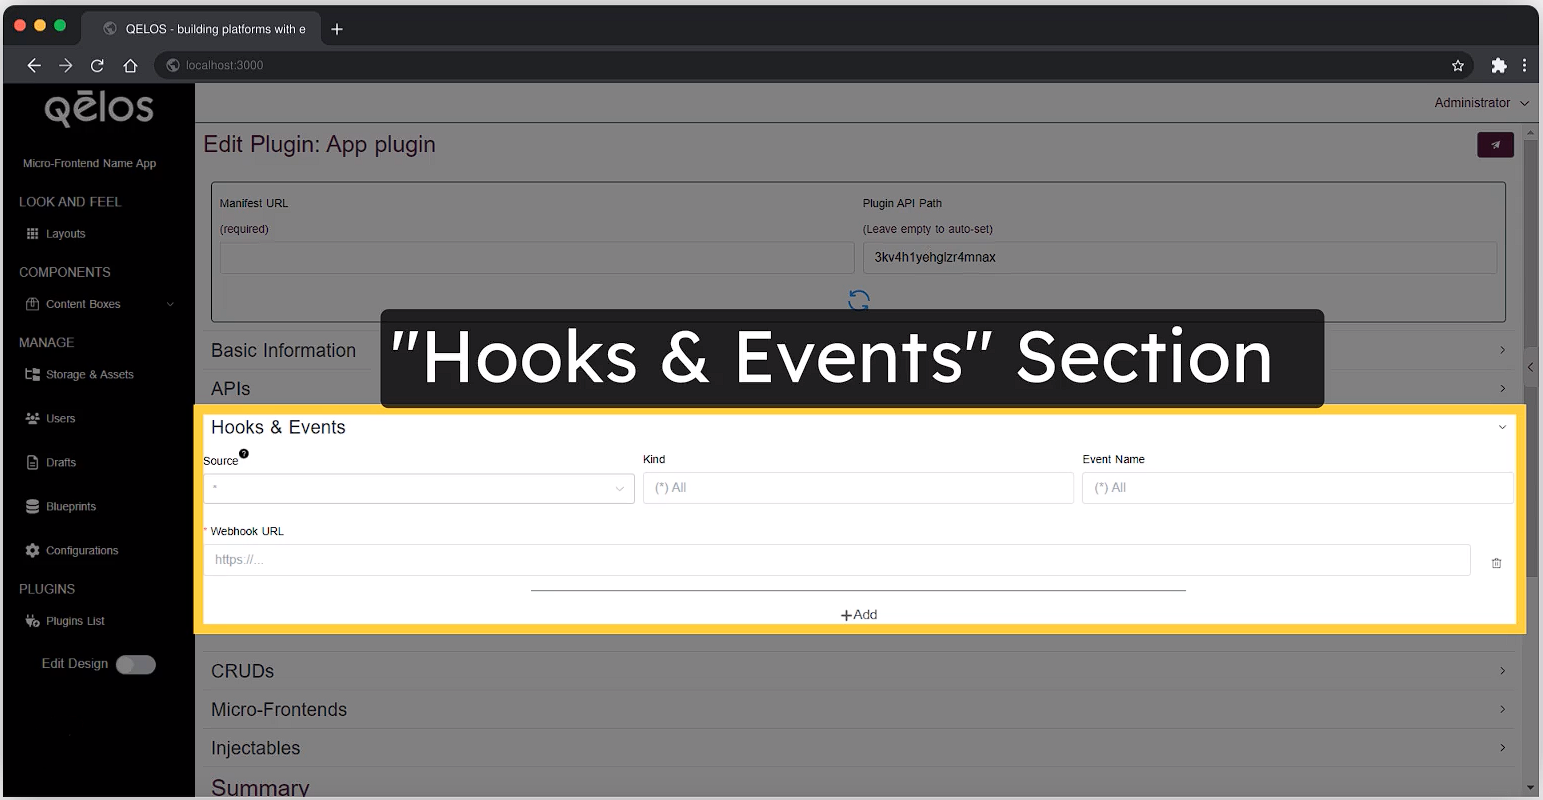
The Hooks & Events section allows you to configure event-driven actions within your system by subscribing to specific blueprint events. This feature is useful for integrating external services, automating workflows, or triggering custom processes whenever certain actions are performed on your blueprints.
Here’s how to configure the Hooks & Events section:
Source:
This field lets you choose the blueprint to which your plugin will subscribe. Events related to this blueprint will trigger the actions defined in this section. Plugin events will have a prefix ofplugin:before their custom event names.Kind:
In this field, specify the name of the blueprint you want to connect. This ensures that the plugin listens only to events associated with the specified blueprint.Event Name:
Here, you can select the type of event that will trigger the webhook. The available options are:- Create: Triggered when a new entity is created within the blueprint.
- Update: Triggered when an existing entity within the blueprint is updated.
- Delete: Triggered when an entity within the blueprint is deleted.
Webhook URL:
Enter the URL of the server or service that will handle the webhook. When the selected event occurs (e.g., a new entity is created), a request will be sent to this URL. This allows you to automate actions such as deploying an application or notifying external systems whenever there is a change in the blueprint.
By configuring these fields, your plugin can effectively respond to blueprint events, making your system more dynamic and responsive to changes.
Micro-Frontends Configuration
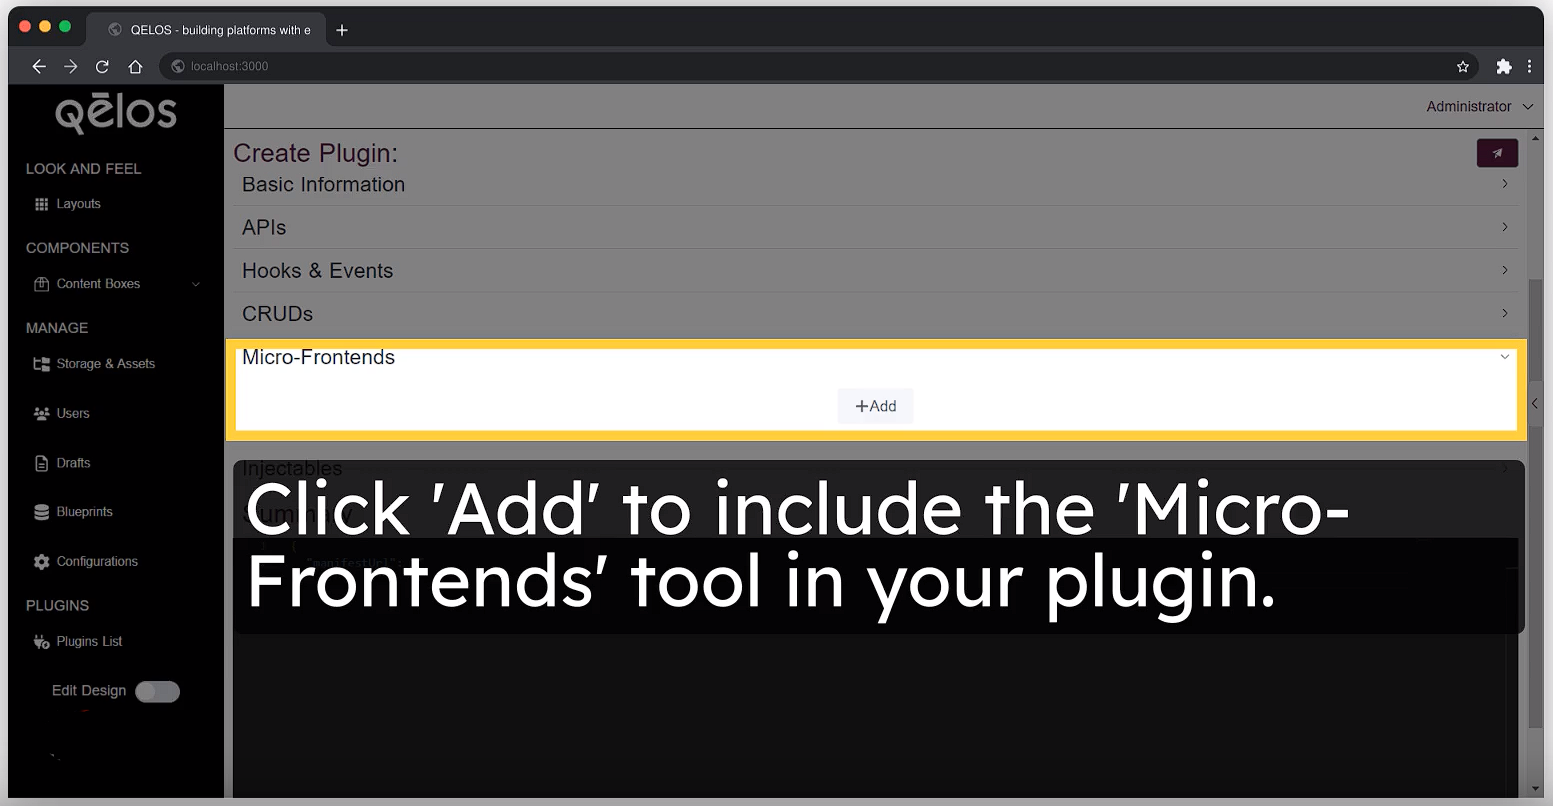
Select the Micro-frontends section and click "Add" to add the tool to your plugin.
In the created table, click the designated icon to start working with Micro-frontends.
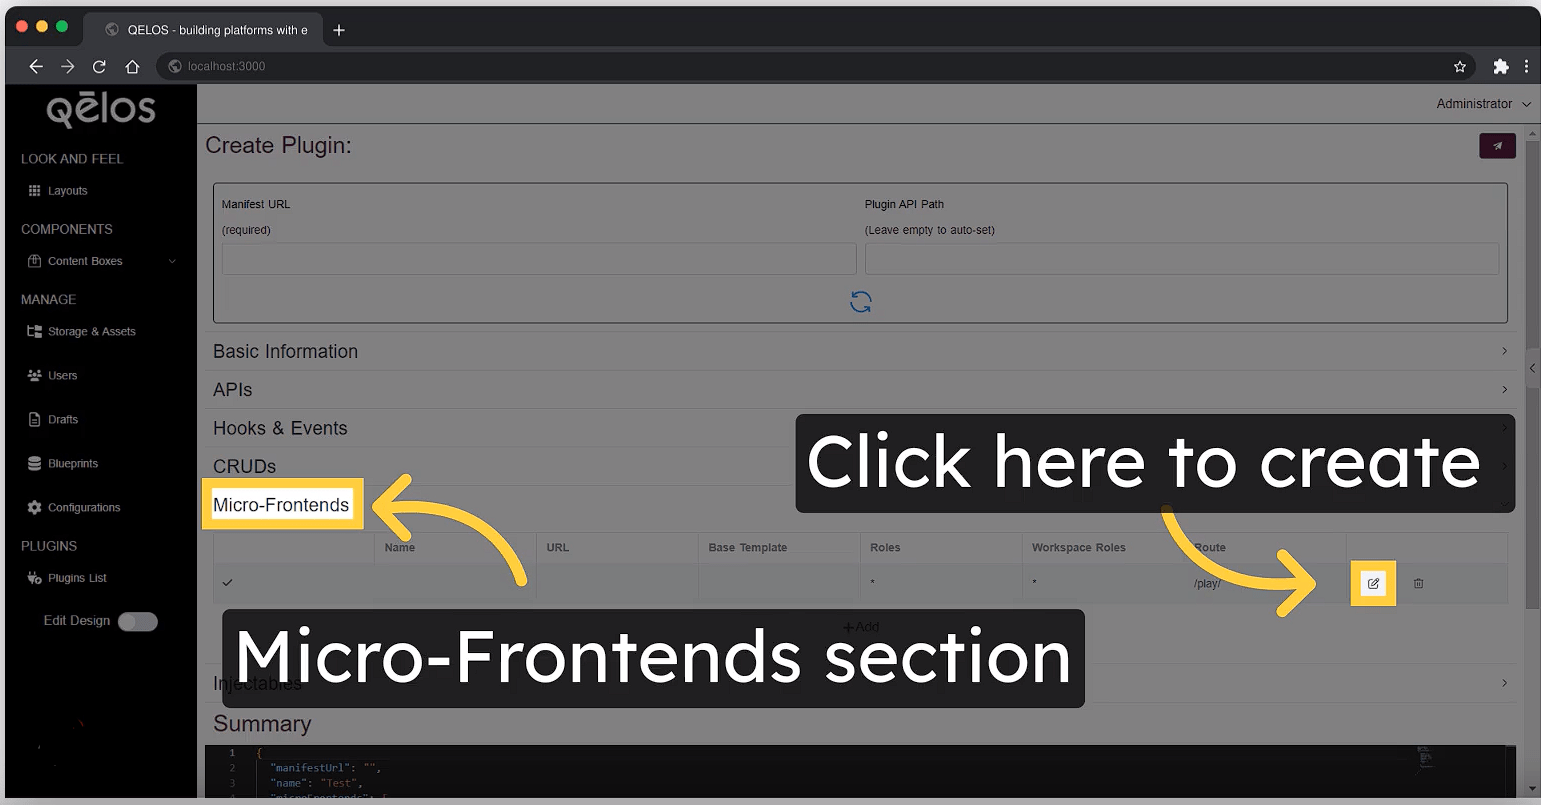
- Here you can add "Name", "Description", "URL", "Roles", "Workspace Roles".
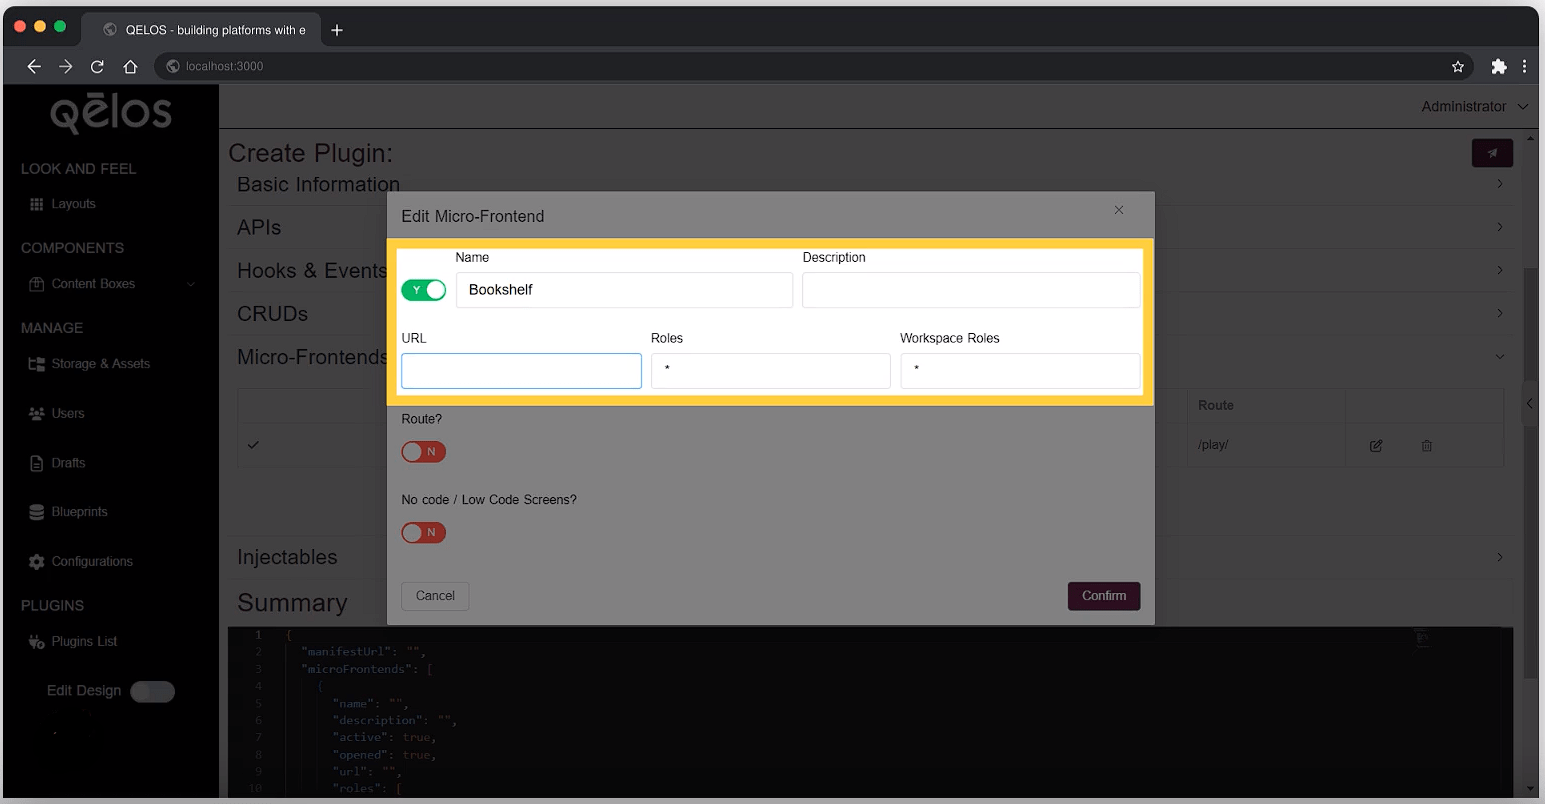
- Name: Create a new page in the application and give it a name, for example, "Meeting Page".
- Description: Add a description for your page to provide context or additional information. This description will be used to label the page in the navigation menu, helping users understand the page's purpose at a glance.
- URL: Specify the URL path for the page to define how it will be accessed within the application. This URL path determines whether the page links to external content or remains internal to the application. For example, you might use an iframe to display external content like google, or use a path like /meeting-page for internal pages.
- Roles: Specify which roles can access the page (e.g., only administrators or specific users).
- Workspace Roles: Specify roles specific to the workspace that can access the page (e.g., workspace administrators or team members). You can choose from staff roles or any specific roles within the workspace to control access. This allows you to restrict the page to members with particular roles inside the workspace, ensuring that only authorized users can view or interact with the page.
Route Configuration
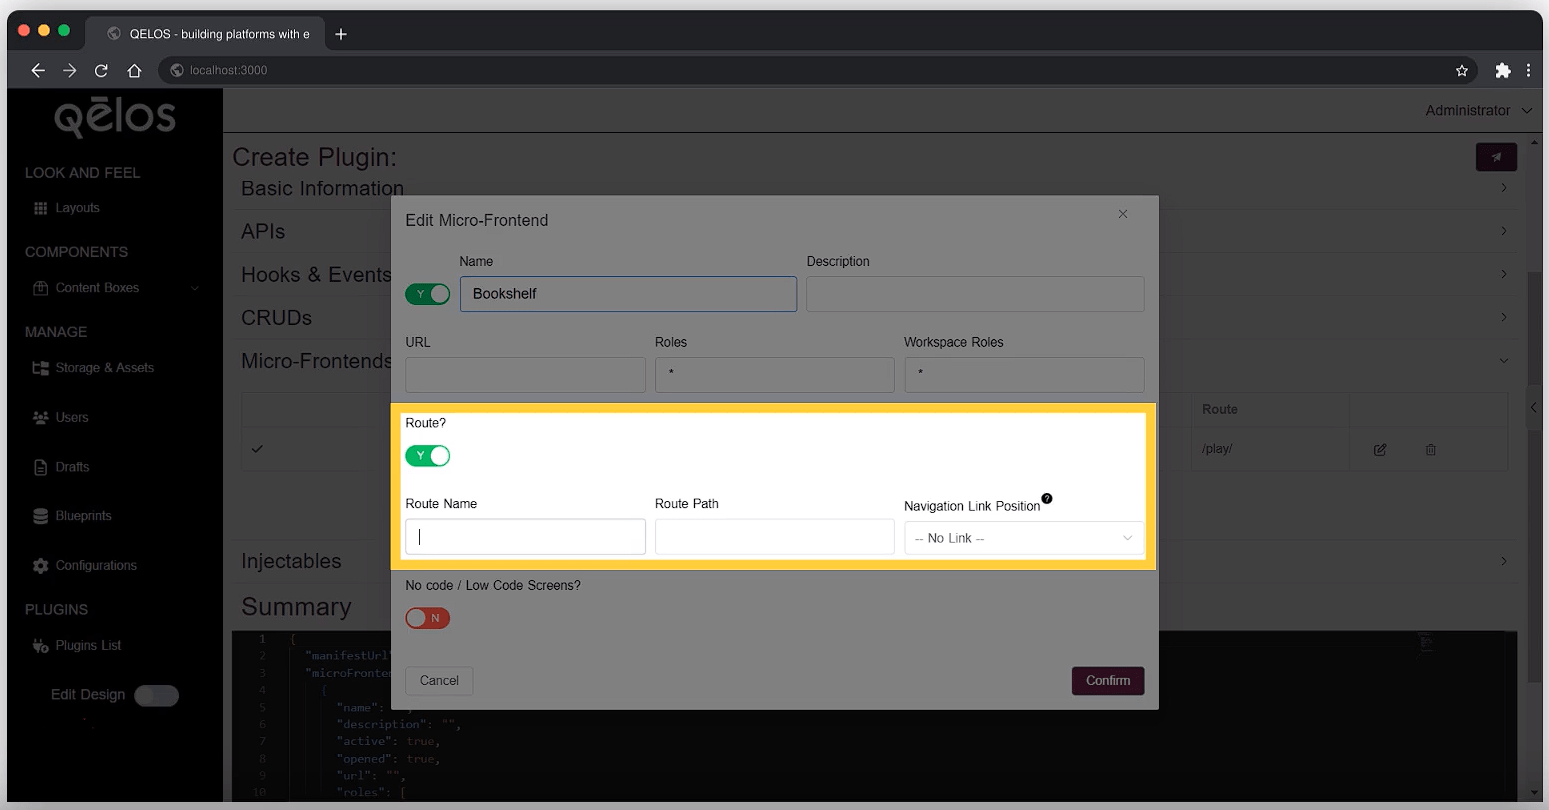
Route Name: for example: meetings
Route Path: Specify the URL path for the page to define how it will be accessed within the application. For example, the route path can be something like meetings for a static page or meetings/:meetingID for a dynamic page where :meetingID is a query parameter. This allows you to use dynamic routes, which can be useful for manipulating and retrieving data from the backend based on the parameters. By using dynamic routes, you can create flexible and customizable navigation within your application.
Navigation Link Position:
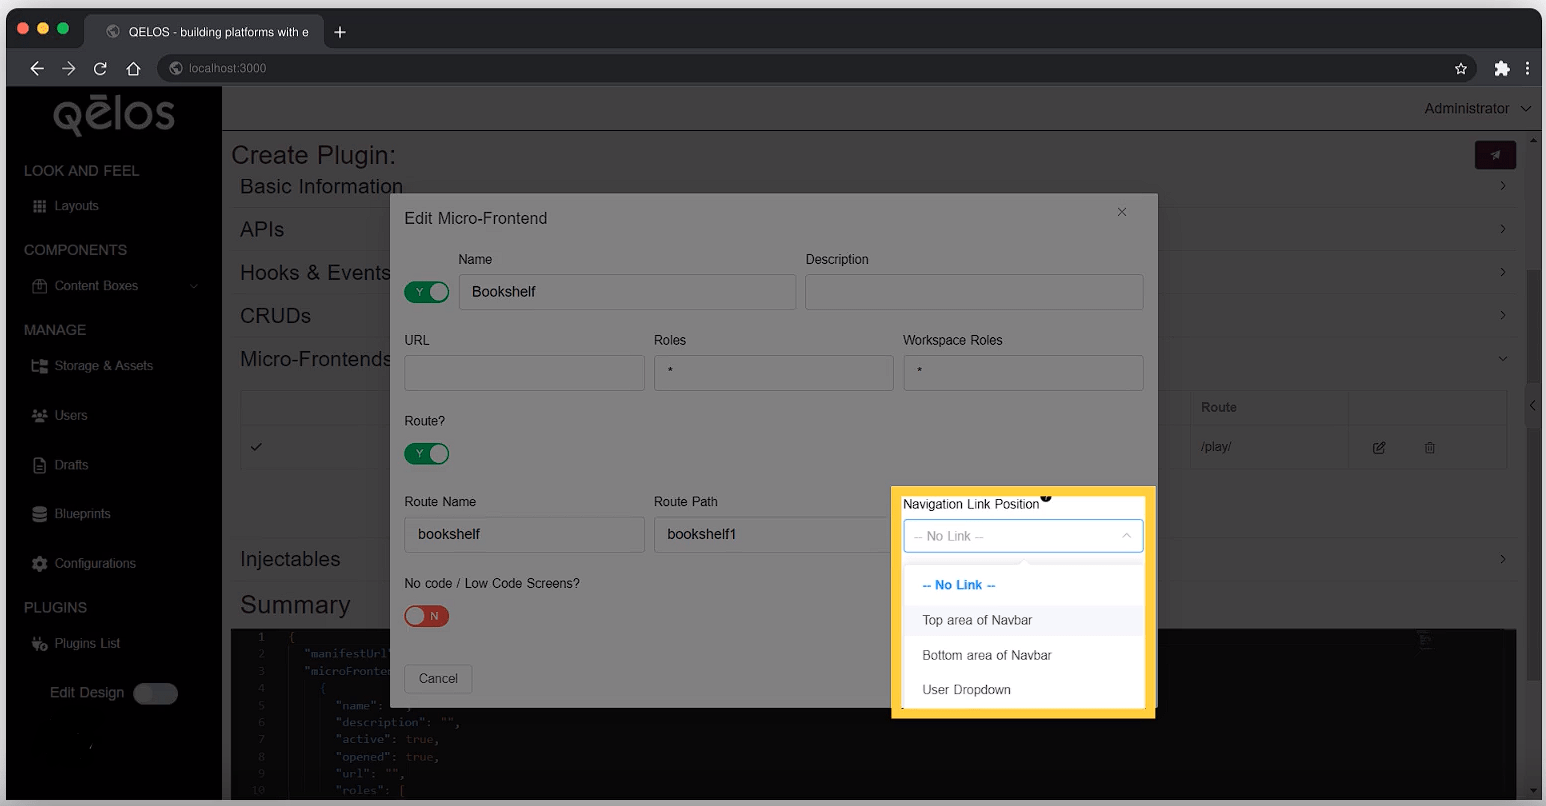
Specify where navigation links will appear within the application. You have the following options:
Top area of Navbar: Place the navigation link at the top of the navigation bar, making it immediately visible and easily accessible. This is ideal for links that you want to highlight and provide quick access to.
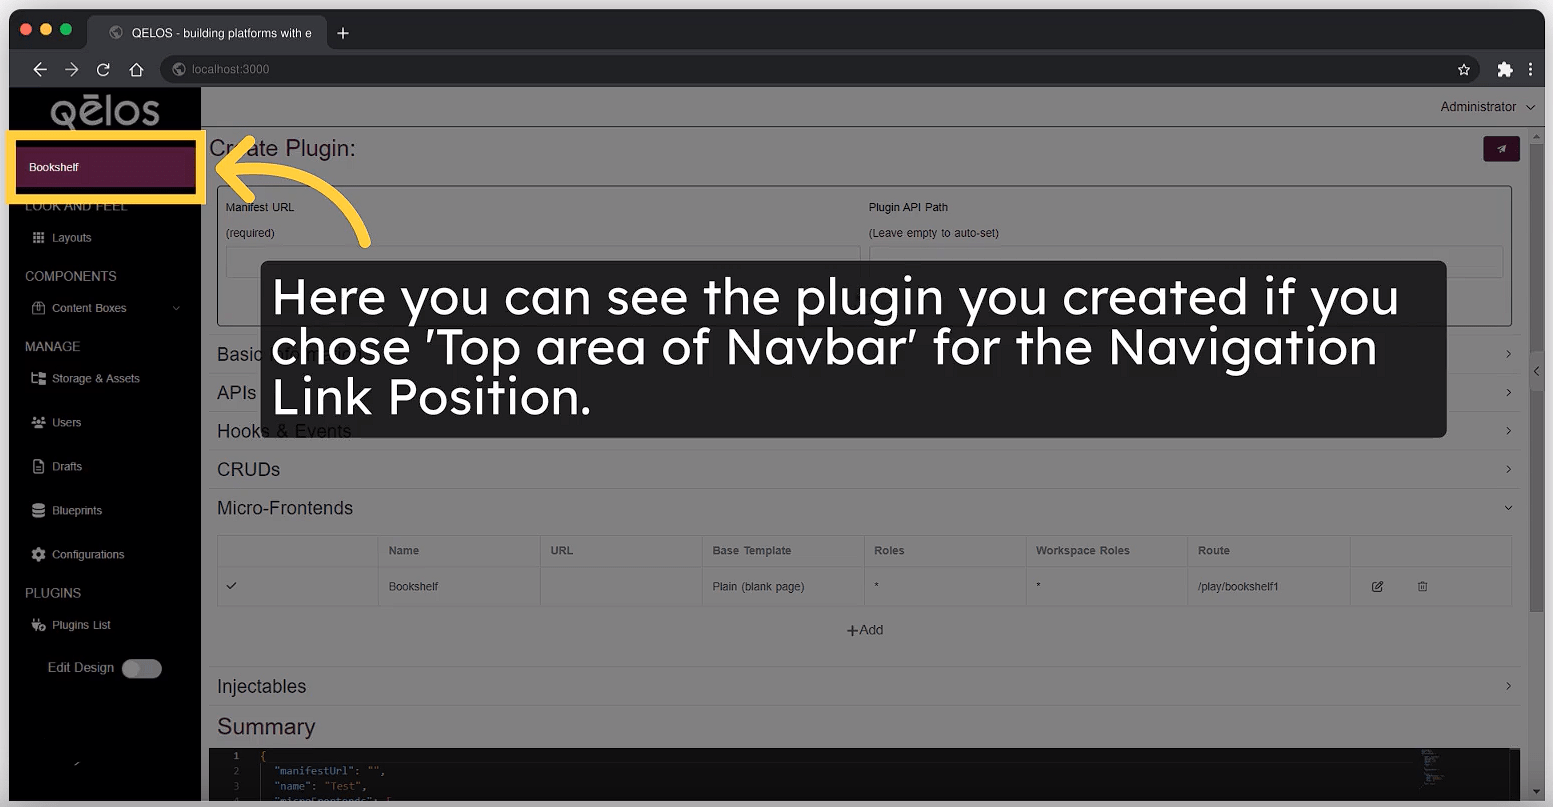
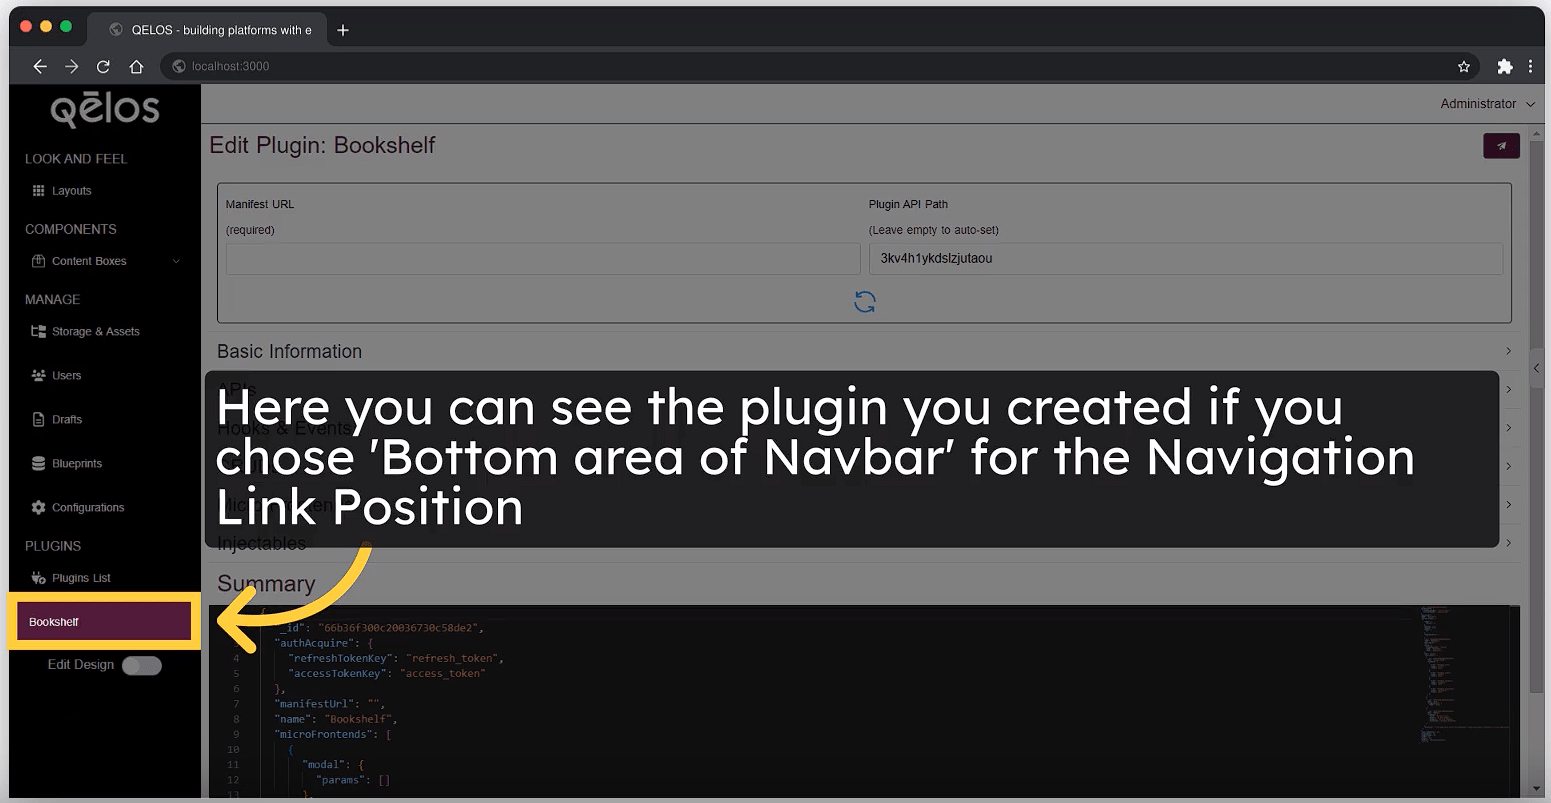
Bottom area of Navbar: Position the link at the bottom of the navigation bar. This makes the link accessible but less prominent, appearing after other items in the navbar. It’s useful for secondary or less frequently used links.
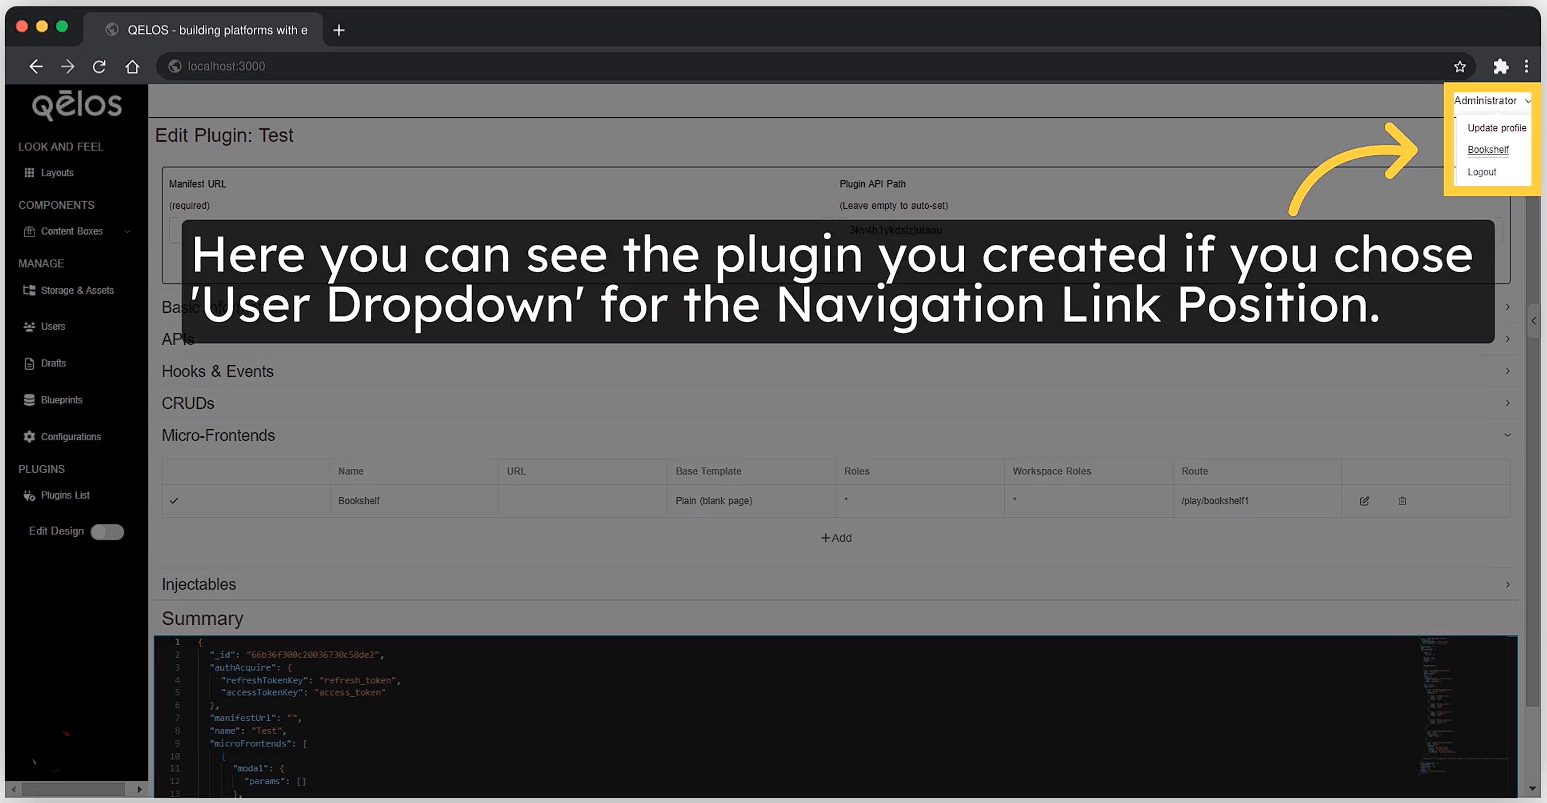
User Dropdown: Add the link to the user dropdown menu. This option allows you to position the link within a user-specific menu. Imagine it nestled between "Update Profile" and "Logout" in the top right corner of the application (think Administrator dropdown menu). This approach is ideal for links relevant only to specific users or those that should be displayed with less prominence.
Additionally, you can create links that do not appear in the navigation bar at all. These links can be used for specific actions, such as creating a new meeting, and can be accessed through other means within the application. For example, you might navigate to these links from another page or through dynamic routes without including them in the main navigation menu.
You can also define navigation groups. This allows you to organize multiple links into a group, which can have its own icon (using FontAwesome, for instance) and be managed as a collective entity in the navigation. For instance, you could create a group for related links that appear together under a content box, enhancing organization and user experience.
Creating No Code / Low Code Screens Configuration
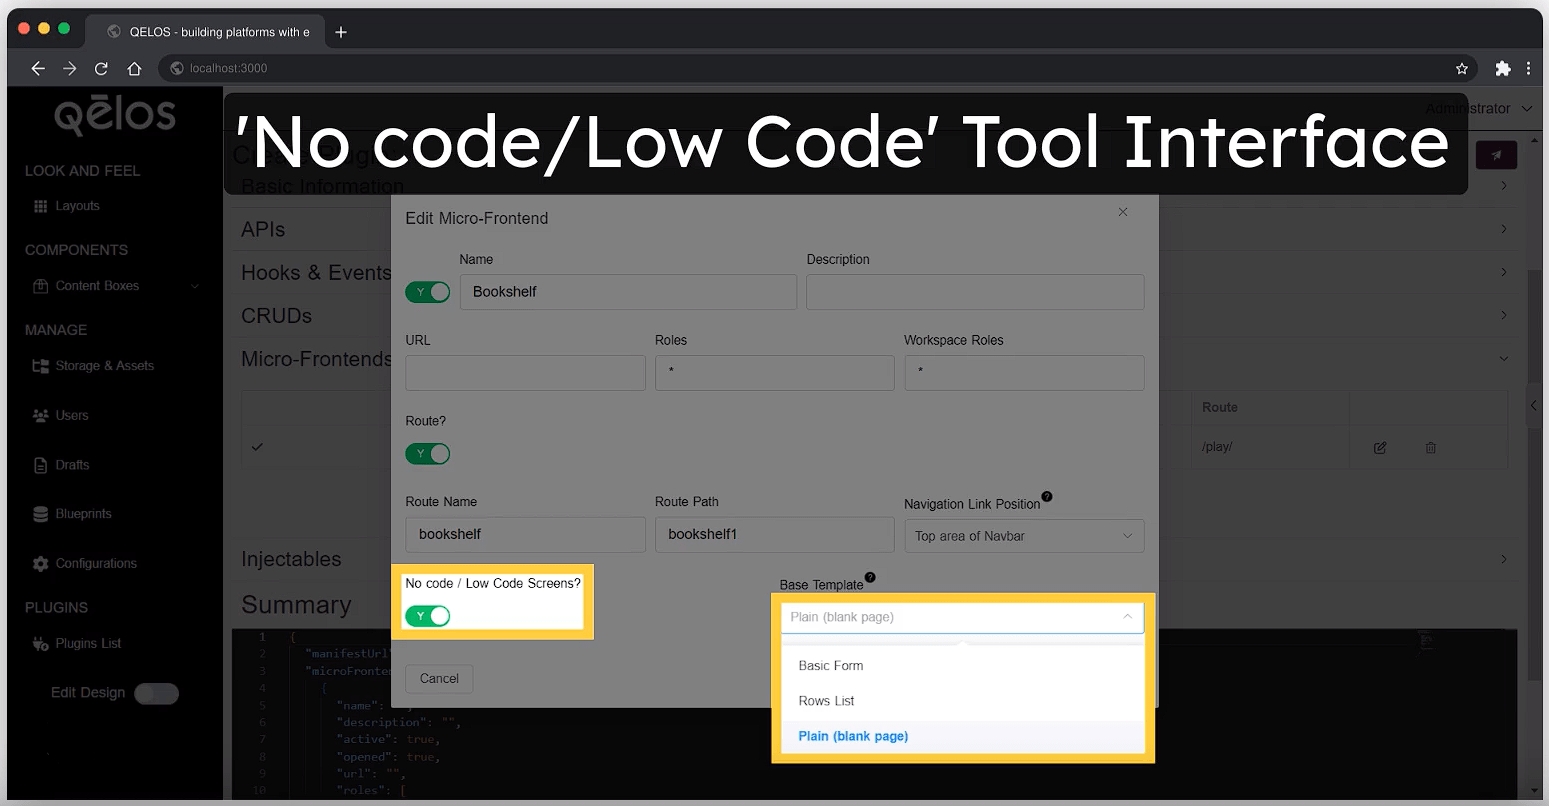
When configuring no-code or low-code screens, you can select from the following base templates to simplify the design process:
Basic Form:
Use this template to create form-based pages that include a form element with built-in submission capabilities. The form will automatically handle data submission to the server and provide user feedback through a confirmation message. This is ideal for scenarios where user input is required and you want to streamline form handling without additional coding.Rows List:
This template is perfect for displaying a list of items where each item follows a repetitive structure. By specifying the HTML for a single row item, the template will automatically generate a list of items based on the provided data. This is useful for creating data-driven pages such as lists of meetings, contacts, or other similar items.Plain (Blank Page):
Opt for this template if you need a completely blank page to build from scratch. It offers maximum flexibility, allowing you to design and structure the page as needed without any predefined elements. Use this option when you have specific design requirements or want to implement custom layouts and functionality.
Select the template that best aligns with your screen's purpose to efficiently create and customize your pages with minimal coding effort.
Creating Injectables
Injectables are powerful tools that allow you to inject HTML, CSS, or JavaScript into your application, making it easy to enhance and customize functionality across the entire application. This is particularly useful for adding analytics, custom styles, scripts, or any additional logic needed.
How to Configure Injectables:
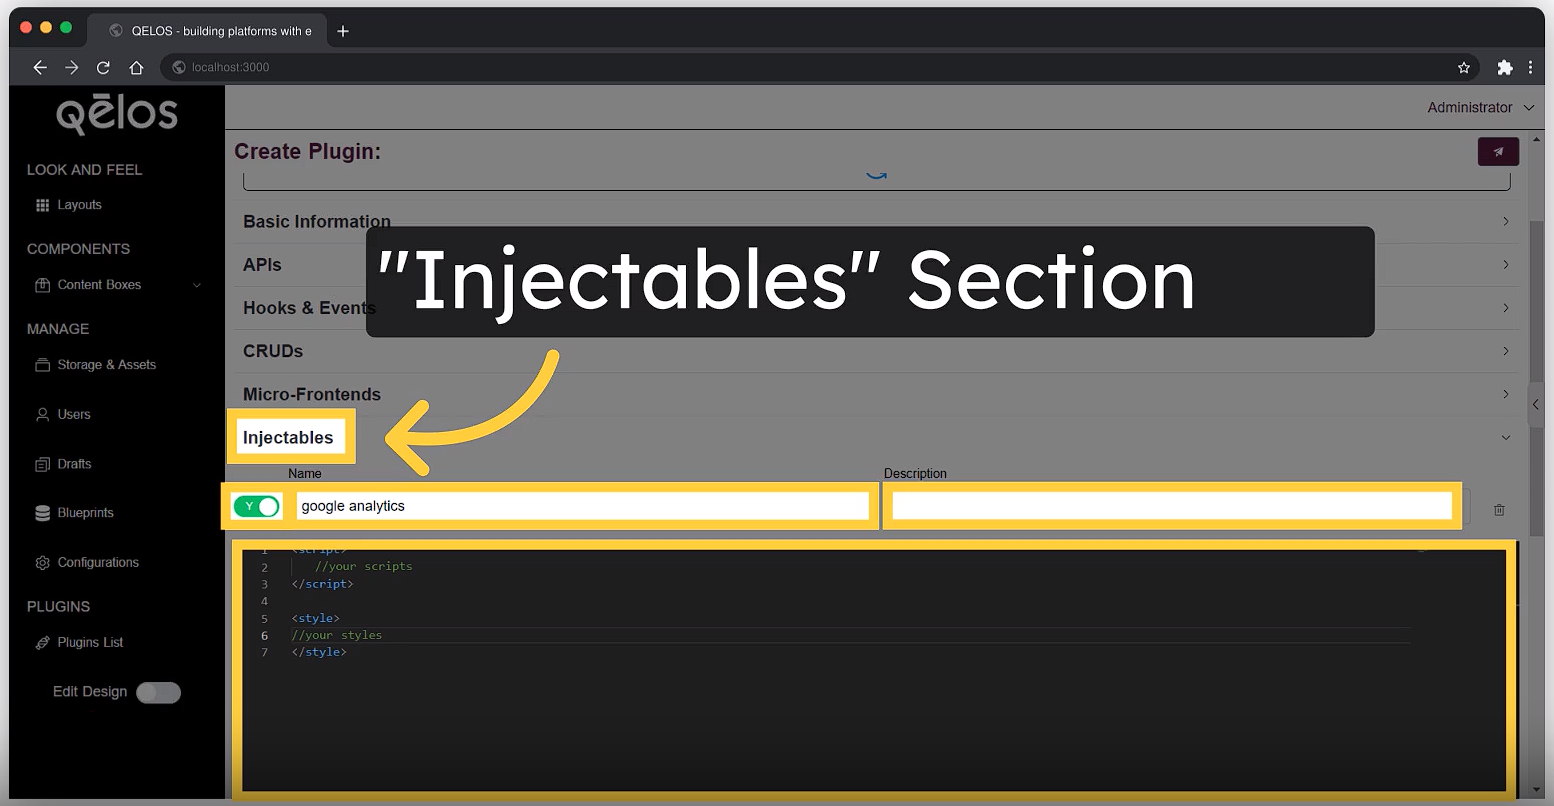
- Here you can add "Name", "Description", and use the "Code Workspace" for writing your code, which can be applied throughout the application.
Name:
For example, "Google Analytics".
Description:
Provide a brief description of the injectable to clarify its purpose and functionality.
Code Workspace:
In this section, you can write the actual code that will be injected into the application. This could include:
- Analytics Tools: Add tracking tools like Google Analytics to monitor user interactions and collect data.
- HTML: Inject HTML elements directly into the application’s pages.
- CSS: Apply custom styles to enhance the look and feel of the application.
- JavaScript: Add scripts to execute custom logic, manipulate the DOM, or integrate additional functionalities.
Here’s how you can effectively use injectables:
- Adding Analytics: You can insert analytics tools by writing the necessary script in the code workspace. For example, to add Google Analytics, you would include the tracking code provided by Google.
- HTML Injection: You can insert HTML snippets to display additional content or elements across your application.
- Custom Styles: Write CSS code to apply consistent styling throughout your application, ensuring a cohesive look and feel.
- JavaScript Logic: Implement JavaScript to handle various tasks like triggering events, managing translations, or performing any other dynamic actions required by your application.
You can turn these injectables on and off as needed, providing flexibility to adapt and refine your application’s behavior and appearance without altering the core codebase.
Using injectables is an efficient way to manage cross-application customizations, making it easy to maintain and update enhancements as your application evolves.
Save the Plugin
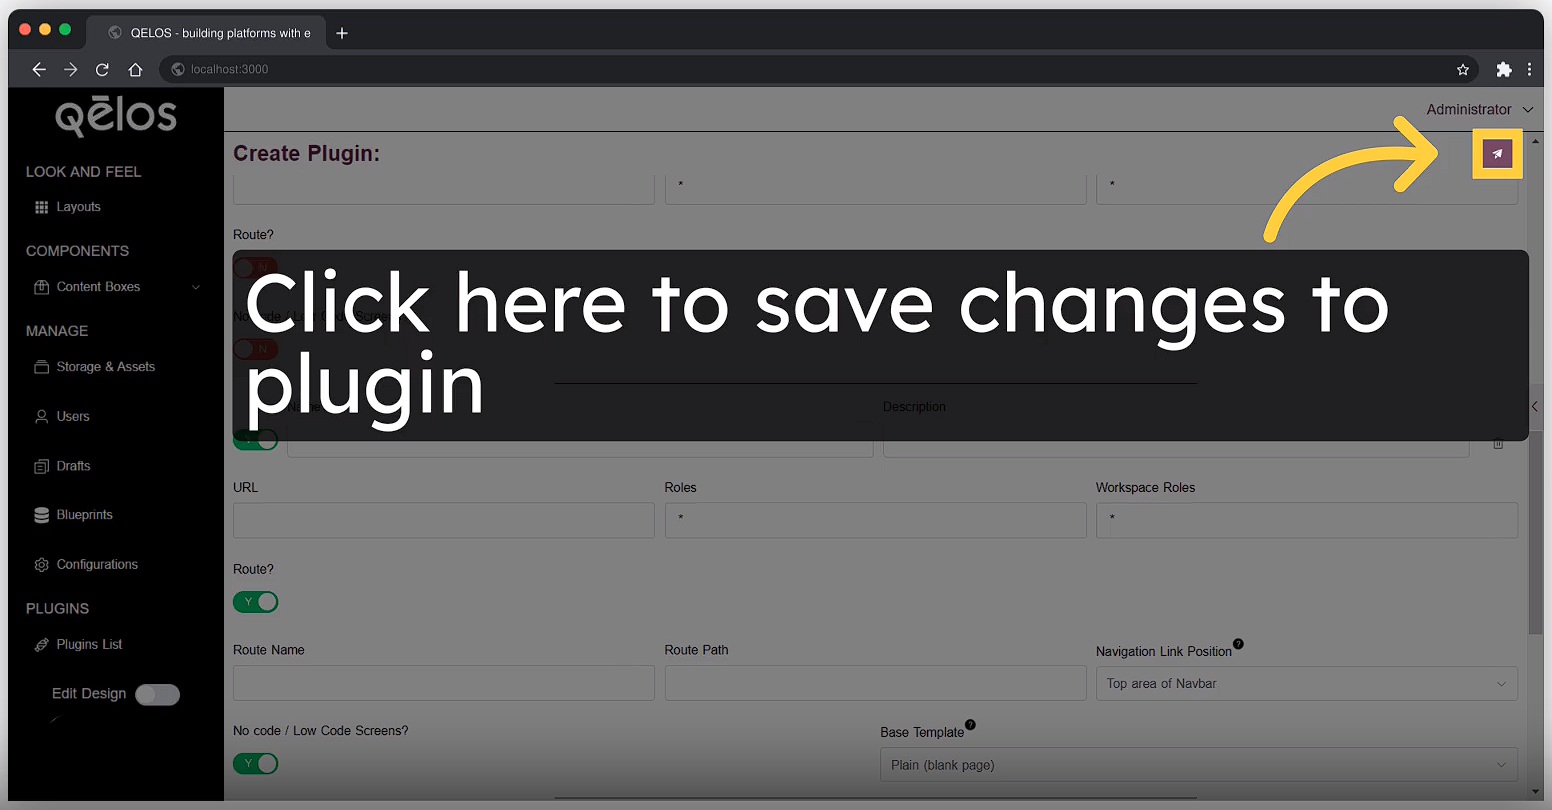
- Click the "Save" button to store your plugin.
Summary Section
The Summary section contains the manifest object structure that you just created.
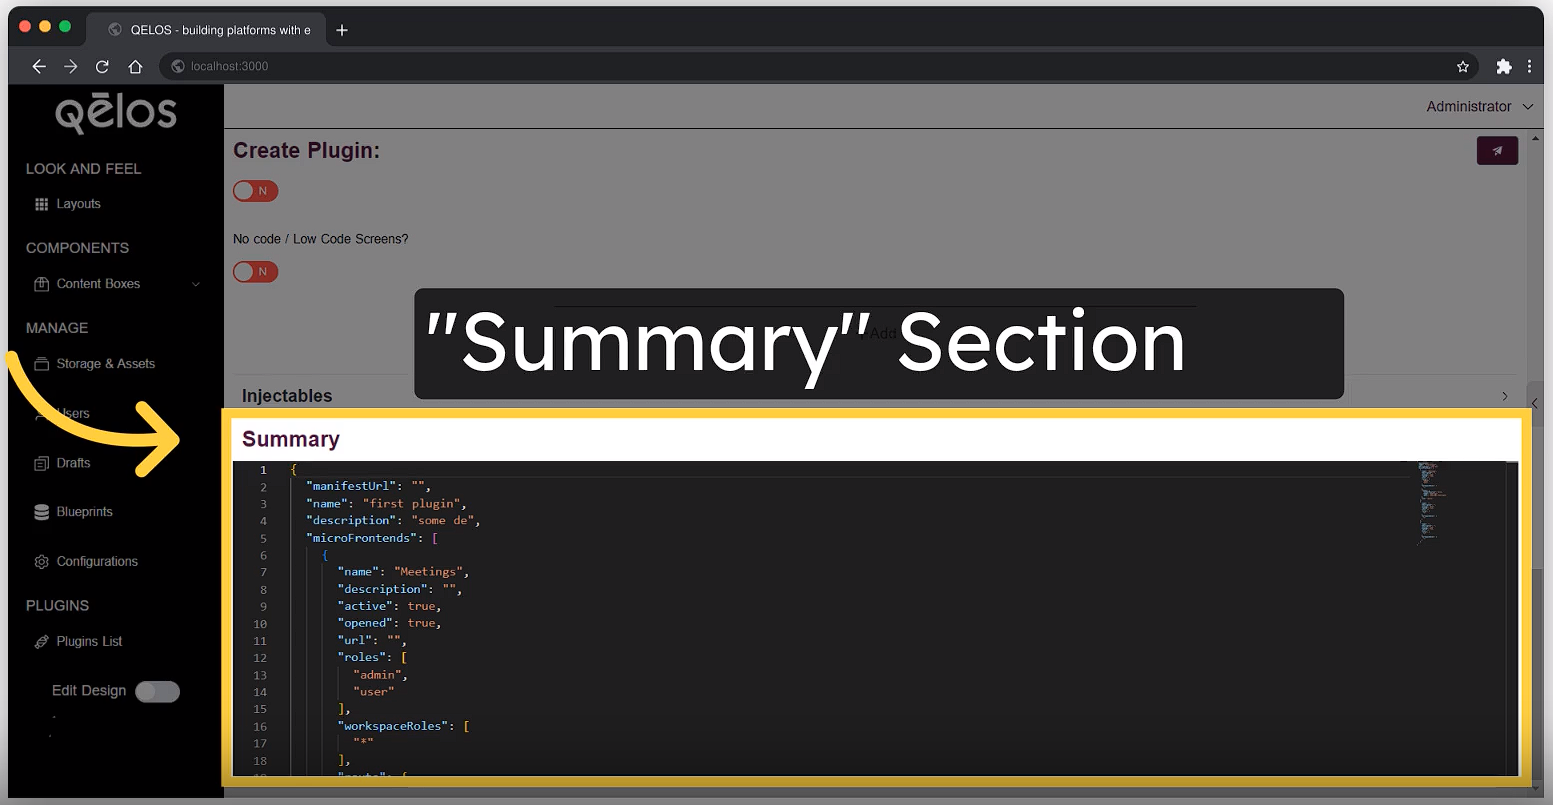
The Summary section contains the manifest object structure that you just created.
You can see the manifest and use it as a server. By copying the manifest, you can create a backend instance of this object, turning it into a plugin without any additional steps.
For example, you can go to an existing plugin you created and view its manifest. This manifest is a complete representation of the plugin, which you can copy and serve as a legitimate plugin from a server. If you serve this object as a manifest, it will function as a plugin.
To control it from the backend, you can create a function that manages this manifest. However, even without setting up a server, you can still create and manage plugins directly from the UI. This flexibility allows you to easily handle plugins according to your development and deployment needs.
Additionally, if you prefer server-side control, you can copy the manifest and release it as an actual manifested plugin. This involves creating server-side code to serve the manifest, allowing for more robust and centralized management of your plugins. This dual approach ensures that you can seamlessly integrate and manage plugins either through the UI or via backend services.
You can also modify your plugin using the manifest. By editing the code in the Code Workspace, you can update the plugin’s functionality, appearance, or behavior. This allows for continuous improvement and customization, ensuring that the plugin evolves to meet your needs.
The Plugin Has Been Created, How Can You Use It?
As a result of our example, the created "Meetings" page is based on the structure you wrote, which you can see in the Summary manifest.
This structure includes a list page title and the necessary code. You can modify everything on this page, such as removing the title or adding new elements. For instance, you can add a "Create New" button to navigate to a configuration page.
You can automatically create tables and define resource sources for these tables. For example, you can show a list of meetings or users, specifying what data to display and how it should be structured.
Administrators can view all data, while regular users will only see their own data, according to the standard permissions set in the blueprints. You can adjust these permissions to fit your application's needs.
Conclusion
By following this step-by-step guide, you will be able to create a plugin on the platform, configure pages, routes, and navigation links, use injectables to add HTML and JavaScript, manage user permissions, and integrate with the API. This process ensures that you can create dynamic, data-driven pages, control user access based on roles, and continuously improve your plugin through the manifest and Code Workspace. The ability to manage plugins directly from the UI or via backend services provides a robust and flexible development environment, allowing your application to adapt and grow with ease.
